


Kits


New! Celebrate this chapter of Ysolda.com as it comes to an end with a special, personalised bundle of our best products, hand-picked by our team just for you.


gift 2019


Subscribe to our Colourwork Club for a gift that lasts well into the new year. Your recipient will receive a new colourwork kit in Janurary, February and March
Last minute shopping? Gift cards are delivered electronically - forward the email or print it for your recipient. A range of amounts are available and gift cards don't expire.

Identifying and Fixing Mistakes in Lace Knitting
Identifying and Fixing Mistakes in Lace Knitting
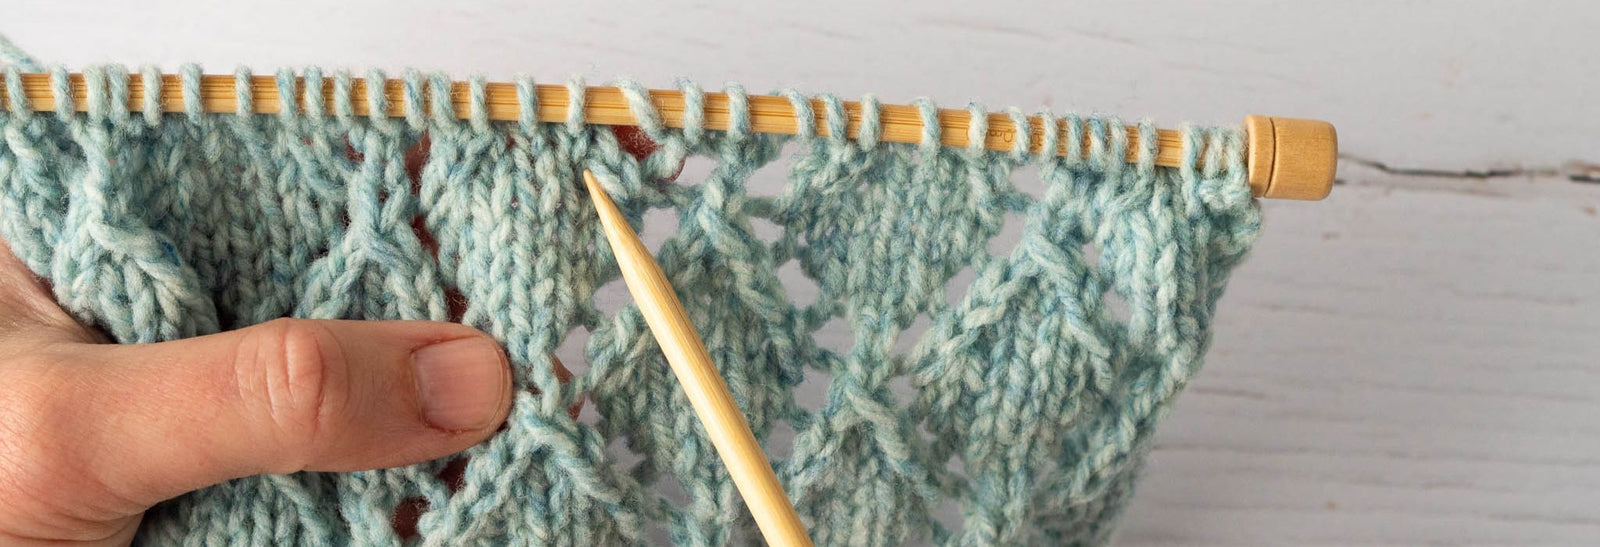

When learning to knit lace, whether it’s a shawl or a hat, mistakes are inevitable! Lace patterns incorporate yarn overs and decreases to create a beautiful finished fabric, but it can be challenging to keep track of your stitch repeats while on the needles.
One of the greatest things about knitting is that do-overs are allowed (and encouraged!) - almost any error can be corrected.
Here, we’ll go over identifying, correcting, and preventing common lace errors. Learning to fix your lace knitting will make your knitting time easier and more enjoyable!
Identify the Issue in Your Lace Knitting
If you're not sure how your stitches correspond to the directions, check out our post on how to read your knitting, then come back to figure out the problem.
First you need to figure out where the error was introduced. Compare the row on your needles to the directions, going stitch by stitch to see if you can find where you made a mistake. If it’s in the same row, you can probably just unknit to get to the error and correct it.

Checking your work against the chart, even if you don’t generally use charts, can also be very helpful since they provide a good overview of how the stitches should interact.
Follow any visual clues such as columns of knit stitches or zigzagging yarn overs and compare them with your work. If you can’t figure it out, take a step back - put the project down if you can, and come back to it a little while later. This can really help when you're frustrated!
Common Lace Errors in Knitting
Missing yarn over
A missing yarn over is one of the most common errors, and one of the easiest to fix!

If you missed a yarn over on the previous row:


Lift the bar between the stitches onto the left needle (making sure it’s oriented the same way as the other stitches).
This is your new yarn over. Depending on how tightly you knit, this yarn over may be on the smaller side since you are creating it from the bar between the stitches.
If you missed a yarn over 2 rows down:


Insert the right needle below the 2nd bar down from your needle and
use it to grab the 1st bar down from your needle, then pull it through.

You’ve created a yarn over + a purl stitch.
Misplaced or extra yarn over

You put the yarn over in, but it's in the wrong place.
If you did the correct number of yarn overs and decreases in the row, you might end up with the right number of stitches, making it a little harder to spot.


Drop the yarn over that’s in the wrong spot
and pick up a new one in the correct place, as for “missing yarn over”.

If you have an extra yarn over that isn’t needed at all, you can usually drop it off the needle on the following row without much of an issue. If it’s been worked over a few rows though, simply dropping it off can cause a loose space between stitches.
Missing or misplaced decrease


You worked a k2tog instead of an ssk, or vice versa, or you did your k2tog in the wrong place.
This can throw off the rest of the row, particularly if you tend to read your knitting to figure out where in the repeat you are.
Errors in the same row you’re working (or within a few rows) can be corrected by carefully unknitting / tinking back to where the error occurred. Otherwise you may need to take more drastic action, such as laddering down.
Unknitting
“Unknitting” describes taking out one stitch at a time, working your way back across the row.


Although it’s a bit slower than just taking your needle out and ripping, unknitting is a great way to ensure that you don’t lose any stitches or lose track of what row you’re on. You can also undo multiple rows with this method.
If you need to go back a considerable amount of rows, you can take your needle out and rip back to a row or two before where you want to be, then work slowly across the last row, pulling the working yarn out of each stitch and then placing that stitch onto the left needle. Make sure you’ve oriented the stitches with the leading leg on the right.
When taking out 2 or 3-stitch decreases, make sure that you catch all the stitches and that they aren’t twisted. To tink a k2tog from the right side carefully insert the needle tip through both stitches before releasing the stitch on the current row.


For an ssk: insert the left needle tip into the left hand stitch of the decrease, slip the stitch off the right needle
and scoop up the free stitch with the right needle tip. Slip it to the left needle, making sure it's orientated to match the other stitches, before continuing. Double, or 3 stitch, decreases can be dealt with in the same way.
Laddering Down
If you need to fix an error more than a couple rows down and don’t want to rip out full rows, you can ladder down a stitch or a section of stitches, and re-knit it correctly. This method can be a bit scary, but you will feel like a superhero for conquering it!


Identify the section of stitches you need to ladder down
and how far you need to go.

Remove these stitches from the needles and begin gently pulling the horizontal strand of yarn that makes up each row, working from the row just below your needles downward and placing the resulting live stitches on a double pointed needle.
When working with slippery yarns, you might want to keep these stitches on a double pointed needle as you ladder down, so that they don’t drop further than you intend.

Each horizontal strand is used for 1 row of stitches. Make sure you don’t accidentally mix up their order - you can pin out the ladders on a pillow or blocking mat to help keep them straight. Pin out the highest strand first, so that the bottom one is on top.

With an empty double pointed needle and the lowest ladder strand, work across the held stitches in pattern - make sure you’re on the correct row! For wrong side rows, you can turn the work to re-knit the row, or ladder up the stitches from the right side only (as if you are knitting in the round).


The almost completely re-knit section (can you spot the error in this photo?)
The re-knit section.
Any small tension issues should block out. They might be more noticeable if the section didn't include exactly the same balance of yarn overs and decreases as the pattern. Using the tip of a needle to spread any excess yarn along the row can help.
Preventing Errors in Lace Knitting

Swatch patterns you’re unfamiliar with - this will give you a great opportunity to practice the stitch pattern, and make it much easier for you to identify mistakes later on in your project. Ripping and re-knitting is much less painful on a smaller swatch than a full-sized shawl!

Place stitch markers between each pattern repeat, to make it easier to check that each repeat is correct. Check your work against the pattern after each pattern row. Note that some patterns may require you to shift markers a stitch to the right or left when working increases and decreases.
Using a lifeline


thread a thin, smooth yarn or thread onto a tapestry needle.
Leaving the stitches on your needles, slip the tapestry needle purl wise through each stitch from right to left.


Draw the lifeline through all the stitches on your needle. Secure the ends of the lifeline if desired.
Now you have a “save point” where all your stitches are on the lifeline, and you can rip back to this row if needed.
Fixing your own knitting mistakes is empowering and satisfying!
With these lace knitting tips and tricks, you'll be prepared for any (knitting) problems that come your way.
Also in Journal


Ysolda’s size chart for knitwear designers
Inclusive size charts for sizes xxs to 7xl, created by a knitwear designer and featuring measurements that can be difficult to find. Newly updated with an extended size range with measurements for cup sizing and broad shoulders.
Read More


Deep Shadow Heel Tutorial
The Deep Shadow sock heel is a beginner friendly short row sock heel that provides a more anatomical fit like a heel flap and gusset.
Read More


20 Years of Ysolda Knitting Patterns: Part 2
June 2025 marks twenty years of designing knitting patterns for Ysolda. In this blog post she picks her favourite from each year for 2015 to 2025,
Read More
